I don't use my computer for games much these days, but I have been playing a bit of Minecraft lately. Minecraft is a strange beast, more of a pastime than an actual game, but well worth the money. I have tried online games before, and although I like shooting things, the first person shooters all look the same after a while, and the MMOs are tedious. A huge, multiplayer lego set turns out to be just what I wanted. Besides, I find the lo-fi graphics and even the obvious bugs in the game charming.
As I was invited to a fancy dress party recently, I decided I needed a Minecarft creeper shirt. The creepers are the most terrifying creatures in the game, and I knew I needed to do them justice. 4 pots of fabric paint and many hours gave this result:
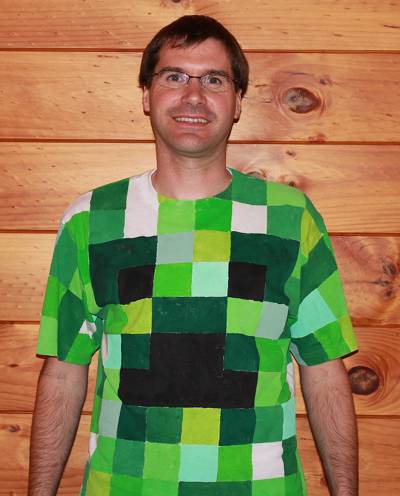
Not too bad, if I say so myself.
Update: I have been asked how the tee shirt was made. This was my first experience with this type of craft, so perhaps a better way exists, but the following steps seemed to work OK:
Materials
- Plain white tee shirt (I brought mine from the Warehouse for the princely sum of $8. If I was going to do it again I might spring for a better quality shirt since the one I got was made from rather thin fabric.)
- Long straight edge ruler
- A dark pencil (2B or similar), dress makers chalk would probably be better
- Textile Ink - I used Fastex Textile Ink which I found in the craft section of Warehouse Stationary. The colours I used for the Creeper design were Black, White, Leaf and Green.
- Some brushes
- Water
- Small containers for mixing colours (I used yogurt pottles)
- Lots of newspaper to protect the table top
- Lots of copier paper for stencils
- Baking paper
- An Iron
- Some scissors
Method
First I ironed the shirt until it was as smooth as I could make it. Then with the ruler and pencil I divided the shirt into squares of equal size. Because the design I wanted extends all around the shirt, some of the squares wrap around across seams.
Don't make the squares too small! Large areas are much quicker to paint than small ones.
I started at the centre line for both the front and marched the squares towards the edges. It doesn't matter that the squares the wrap around over the seams are slightly different widths, being symmetrical is more important.
With the dining table covered in newspaper, I laid out the tee shirt as flat as I could. Then I inserted the glossy insert magazines that came with the paper into the tee shirt to keep the inside surfaces from touching. This is to stop the ink from bleeding through to the reverse surface when you brush it on.
I used a purpose-bought Weekend Herald for this, because I knew it came with a lot of glossy paper inserts that will not absorb ink or fall apart when damp like newsprint will. If you follow my lead, it is vitally important not to accidentally glance at any of the editorials, regular columns, or especially the letters to the editor. You need to maintain your calm for applying the ink.
To get really straight edges on the design it is best to mask out the fabric with masking tape. I found the really cheap off-brand sello-tape works even better, as the adhesive sticks just well enough to do the job but comes off very easily. However, I had far to many square to paint, so I just used bits of copier paper cut more or less straight with scissors. Holding down the paper against the fabric with one hand, I quickly brushed on the int with the other, taking particular care with the corners. Working this way I found I could do a square every couple of minutes.
I needed a lot a shades of green, so I was continuously mixing colours. Some very vivid colours can be created, but mixing in too much black or white just results in a muddy mess. Some of the squares are supposed to be white - I just left them unpainted.
The squares that wrap around from front to back across the seams were the hardest. I carefully folded the sides of the shirt up to reach the hidden side, then placed bits of baking paper over the wet ink before I laid the fabric flat against the newsprint. The prevented the ink from smearing if the shirt moved around, the baking paper doesn't get stuck to the ink as it dries.
Once the front was done and completely dry, I fixed the ink (see below) before completing the other side. Remember the wash and dry your brushes.
Fixing the ink (so it doesn't run when damp) is done with a hot iron. Iron each part of the shirt for 3-5 minutes to make sure that the ink stay where it is supposed to. I thought I did a pretty good job, but found the the black areas still ran a little when I washed the shirt, so you might like to pay particular attention to dark colours.
Go forth and impress peopleresults may vary with your custom, one-of-a-kind shirt.