I have a new hobby - digital electronics! Last week I bought an Arduino Uno on a whim from JayCar. Being a typical programmer, I have very little idea how computers actually work on the physical level so this gives me an easy introduction to lower-level coding and electronics in general.
The Arduino is a small board with a fairly capable 8 bit microprocessor (an ATmega328 to be precise) with the IO pins hooked up to convenient headers ready for attaching external devices. The CPU has its own RAM and programmable flash memory, and it comes with a bootloader that can reprogram the flash via the handy USB connection (which can also power the whole board). It is hard to imagine a more plug-n-play device.
I 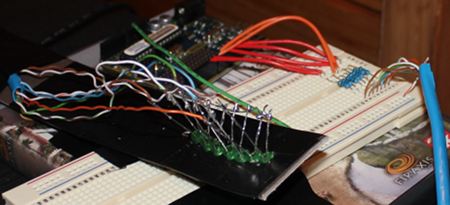 decided that I would follow the well-worn path and create a persistence of vision device for my first project. Mine consists of 7 LEDs hooked up to IO 7 pins (via appropriate resistors), the idea is to make the LEDs blink in such a way that recognisable shapes appear as the LEDs are waved quickly in front of your eyes.
My prototype is a little rough, but works fine in a darkened room (I was too cheap to spring for super bright LEDs and the darkness hides my shoddy soldering job.) The breadboard is too fragile to wave around so the LEDs are mounted on cardboard and connected using a couple of metres of CAT5, which conveniently has 8 internal wires to supply the 7 LEDs with a common ground. The total cost is less than $10, excluding the breadboard and the Arduino itself.
The  Arduino programming environment is pretty nifty. The language used is a limited form of C++ (no standard library or runtime support for much of anything) with some extra libraries for managing the CPU's features. Compiling and flashing the CPU is as simple as pushing a button. Here is the code that generated the above picture:
// Array holding the graphic to display
static char* text[] = {
" XX   X     X  XX     XXXX   XXXX  X     X     ",
"X  X  XX    X  X  X   X   X  X     X     X     ",
"X  X  X X   X  X   X  X   X  X     X     X     ",
"XXXX  X  X  X  X   X  XXXX   XXX   X  X  X     ",
"X  X  X   X X  X   X  X X    X     X  X  X     ",
"X  X  X    XX  X  X   X  X   X     X  X  X     ",
"X  X  X     X  XXX    X   X  XXXX   XX XX      " };

static int outputPins[] = { 12, 11, 10, 9, 8, 7, 6 };
static int graphicLength;


void setup()
{
    // setup the initial state of the pins
  for (int i = 6; i<=12; ++i)
  {
    pinMode(i, OUTPUT);
  }
    // pin 13 is hardwired to the onboard LED, turn it off
  pinMode(13, OUTPUT);
  digitalWrite(13, LOW);

  graphicLength = 0;
  for (char* t = text[0]; *t!=0; ++t)
  {
    ++graphicLength;
  }
}

void loop()
{
  while (1)
  {
    for (int i = 0; i < graphicLength; ++i )
    {
        // find out if the pin is supposed to be on (HIGH) or off (LOW)
      for (int pin = 0; pin < (sizeof( outputPins) / sizeof(outputPins[0])); ++pin )
      {
        if (text[pin][i] == ' ')
        {
          digitalWrite( outputPins[pin], LOW );
        }
        else
        {
          digitalWrite( outputPins[pin], HIGH );
        }
      }
      delay( 1 );
    }
  }
}
Not very efficient but simple enough to get going. I am already working on a more functional version which will have its own font and interrupt driven display.