Let me be upfront about this - I am in no position to give a tutorial on Blender. In fact, I have only been using Blender for a couple of weeks so take everything I say here with a large grain of salt.
So what I am doing here? Firstly, I am showing off how l33t I am with the above animation that took me hours to complete. But secondly, I found that there are plenty of excellent video tutorials for using blender online but very few text based resources so I am putting this out there in case someone else needs this but does not want to wade through hours of YouTube.
I probably did a bunch of things wrong so don't follow this too closely.
First Steps
To make an animation like this you need 2 images - a texture and a displacement map. The texture controls the colour of the surface at each point. The displacement map controls how high the point is above the surface.
For the Moon this is easy, NASA provides both for exactly this purpose as part of the CGI Moon Kit.

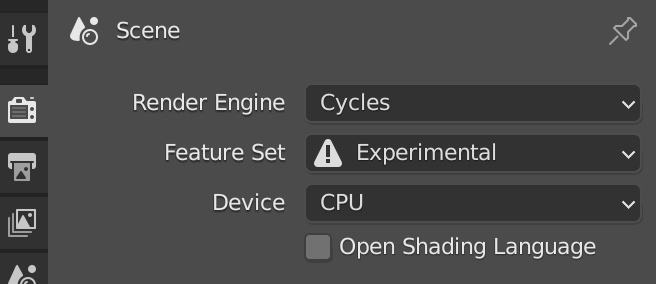
Displacement maps are a really cool way of providing detail without actually modeling anything but they only work in the Cycles render engine and only if you turn on the Experimental feature set in the Render Properties tab.
The model is laughably simple - it is a UV Sphere but I think I probably should have used an Ico Sphere instead. UV Spheres are easier to unwrap for manual texturing but we are not going to be doing that and Ico Spheres are much nicer around the poles. I don't think it matters too much here because of what we are going to do next.
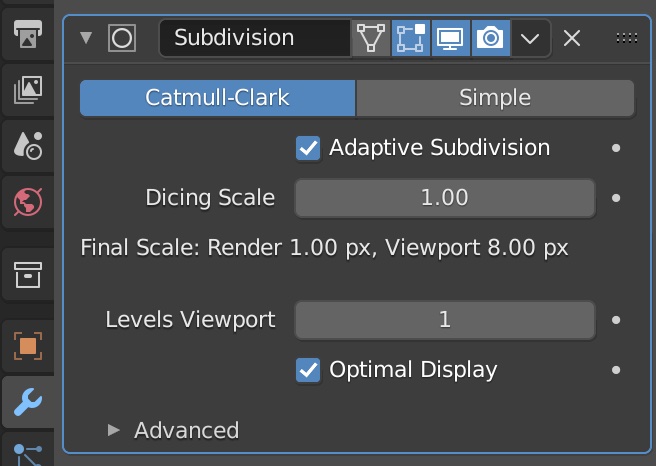
We are going to deform the sphere to add real mountains and craters to the surface using the displacement map but our sphere does not have very much detail to work with. To fix this, go to the Modifier tab and add a Subdivision Surface modifier then turn on Adaptive SubdivisionIf you don't see a control for Adaptive Subdivision then you have forgotten to turn on the Experimental feature set in the Render Properties.. This automatically adds geometery around the bumpy areas of our displacement map.
Now we need a material.
Setting up the Material
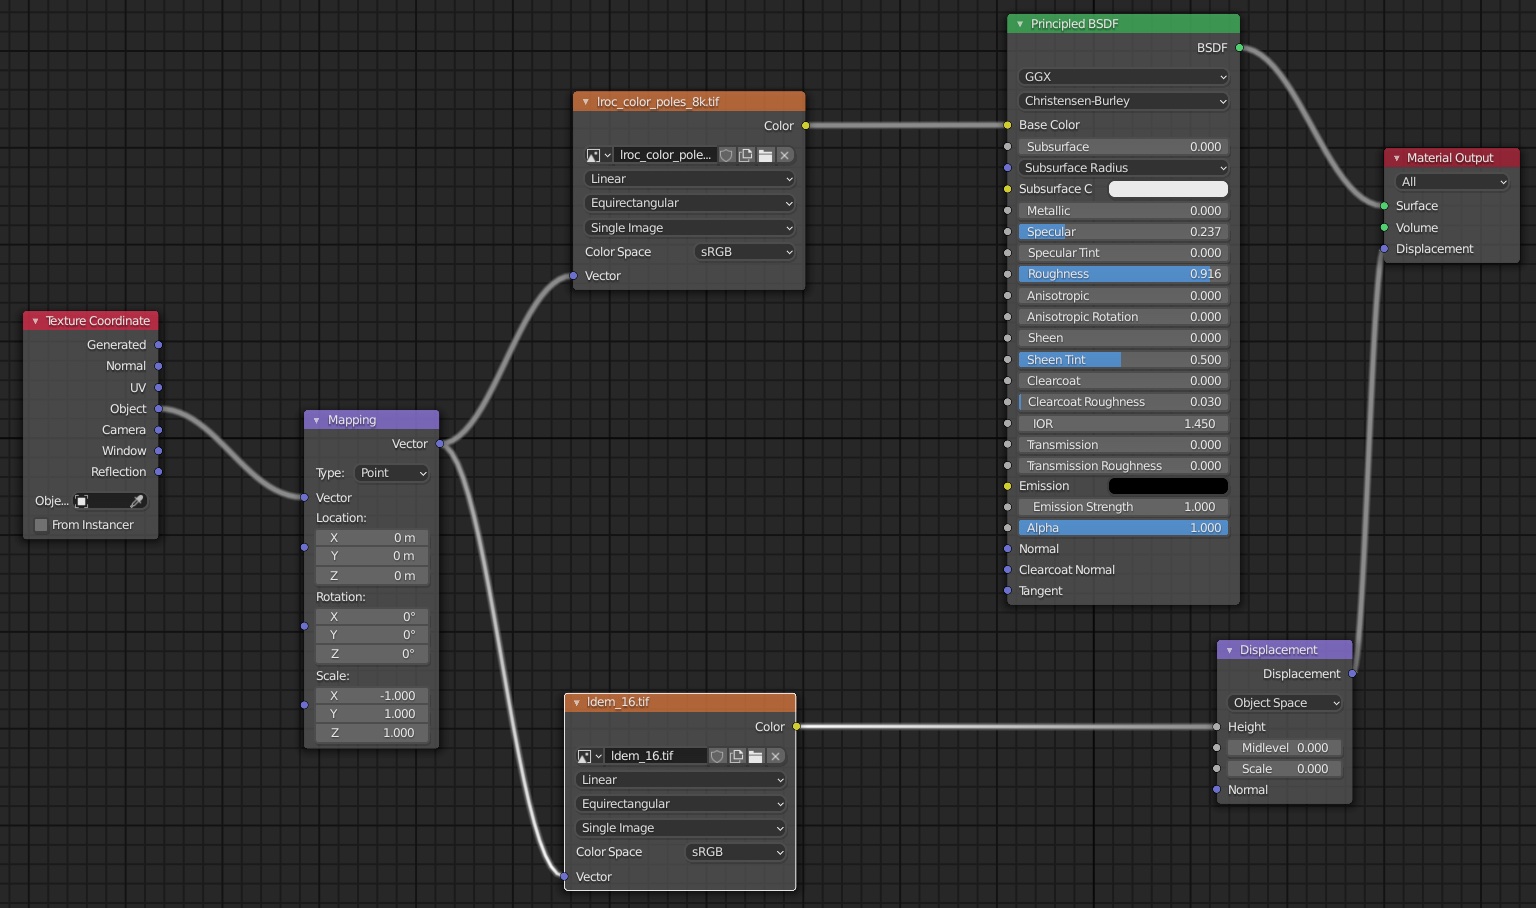
This looks daunting but I love the way materials are created in Blender. The nodes clip together is such a satisfying way.
From left to right we have:
- A Texture Coordinate nodeAdd->Input->Texture Cooridinate which supplies the following nodes with the coordinates across the surface that they will use to lookup the colour of the image. Here I am using the Object output - the coorindates will be automatically generated from the geometry of the object itself.
- But first a Mapping nodeAdd->Vector->Mapping. I'll explain why soon.
- Now we add the two images as Environment TexturesAdd->Texture->Environment Texture. It is important that we use Environment textures here because Blender knows how to correctly wrap the flat images around the spherical model. But there is a problem - Environment Textures are supposed to be viewed from inside the model and we want to view the Moon from the outside - the texture would be mirrored. This is what the Mapping node is for - set the scale along the X axis to -1 and everything will be fine. The Color Space for the displacement map should probably be set to Linear if you want a realistic surface. In this example I left it on sRGB which makes for very dramatic mountains as it distorts the colors of the imagesRGB is designed to map colors for display on monitors but the heights in these displayment maps are linear. Is this artistic license or did I just figure this out now? Nobody can say for sure but I am not going back to change it.
- The Color output of the image texture plugs into the Base Color input of the Principled BSDF node as usual. I toned done the Specular Highlights and bumped up the Roughness - nobody likes a shiny Moon.
- The Color output of the displacement map goes to the Height input of a Displacement nodeAdd->Vector->Displacement. Our model is small and the displacement is measured in either half meters or kilometers depending so I had to adjust the scale down to 0.002 to make things fit. This is in no way accurate, I just eyeballed it until I got the effect I wanted. The output plugs into the Displacement input of the Material Output node.
I didn't bother with bump mapping since we have real displacement.
Now all that is left to do is set up some dynamic space lighting and animate a flyby.
Problems
I am not totally happy with the animation above. These are the problems I can see:
- The aforementioned linear/sRGB colourspace issue. It really should be linear.
- It would probably be a better idea to set up the units in Blender so that the Moon is close to its actual size. The NASA imagery is very good about having consistent units so we might as well use them.
- The animation flies directly over the poles which do not have very good texturing because of the way the images are stretched and squashed onto the sphere. Using a Ico Sphere would help a little here but the real solution is to patch in another material near the poles - this seems like a lot of work that I am not prepared to do.